Today, I will show you “the best trick of removing background image using Picsart” Although it contains a lot of other useful tools for editing photos, we can’t discuss everything in one post. If you are eager to learn to remove background from any photos using PicsArt; Just follow this Step by Step guide.
PicsArt is a very popular photo-editing app, filled with most of the tools to work with photos to make them eye-catching. The app has been downloaded more than 500 million times on Android and got 9 million reviews with a star rating of 4.3 out of 5.
You can follow the guide on any platform either it is Android or iOS. I can guarantee, if you followed this tutorial until the end, you will be able to remove the background effortlessly from any image. Let’s start the tutorial:-
Table of Contents
Step 1 – Download PicsArt App
- To start editing the app, you must have the app on your phone. Just click the below button to download the app; if you are running an android phone then click on the Android button otherwise for Apple users Click on iOS.
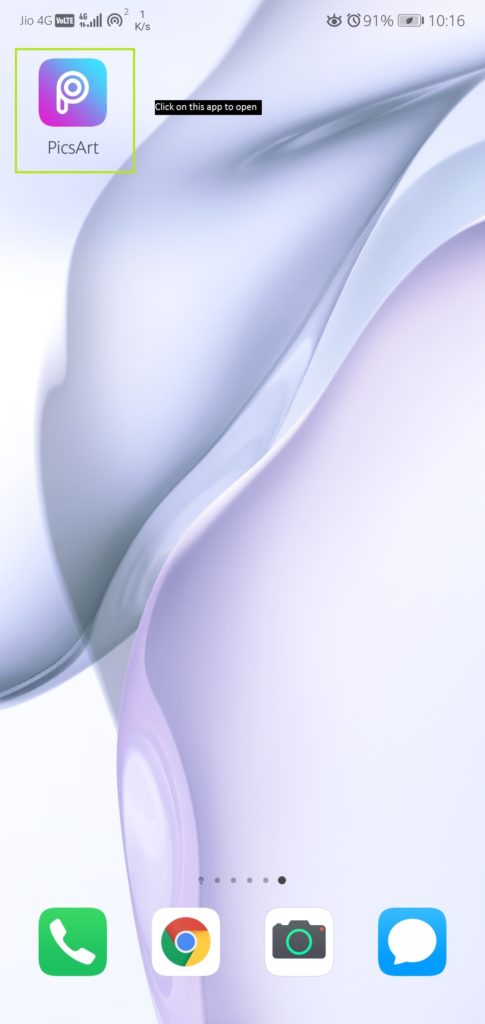
Step 2- Open the PicsArt app
- After downloading the app, open the app. If somehow you are having trouble finding the app you can use the search option.
- When you open the app you will be prompted with the fascinating interface. In which by order we have a home, discover, add, Challenges, and Account option (Left to right) at the bottom of the app.
Here is a little introduction for all the options available to use at the bottom of the app:-
- Home – In the home button, you will find uploads from the PicsArt community such as trending photos, Replays, etc.
- Discover- In the Discover option, you will find lots of hashtags and photos around the world. You can explore it according to your interests.
- Add – You can Add photos or videos for editing or removing the background from the Image; by tapping Add button in the center you will be prompted to select photos or videos. After that, you can proceed to edit.
- Challenges- PicsArt give challenges to their users to explore and use their skill. Also if anyone wins the challenge he/she will be rewarded with the prize. In this tap, you will find challenges every day waiting for you.
- Profile- In order to do challenges and post photos in PicsArt you have to create an account. There are several options available to sign in. Thus the last option in the bottom is Account, for managing your account.

Step 3- Select the Image
- To add photos in PicsArt click on the plus button which you can see in the above picture.
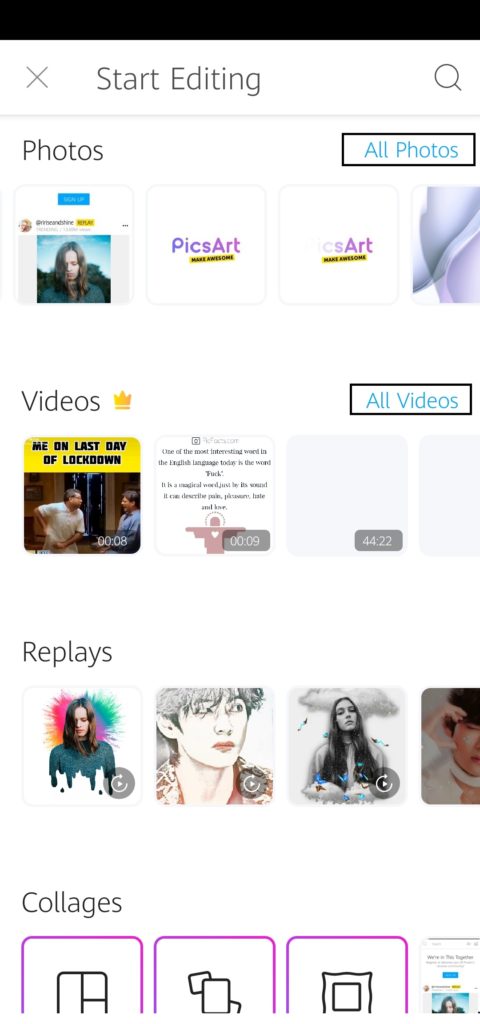
- After you click the button you will see many options to use such as Photos, Videos, Replay, Collages, etc.
- To choose your desired photo from your phone gallery, click on the “All Photos” option beside “Photos” and choose the photo you want to remove the background.
- You can also choose photos to edit from your gallery directly. Just open the image in the gallery and you will see the “Share” option; just click on the Share and select “PicsArt”. Your Image will be ready to edit in PicsArt in no time.
Step 4- Select the Cutout tool
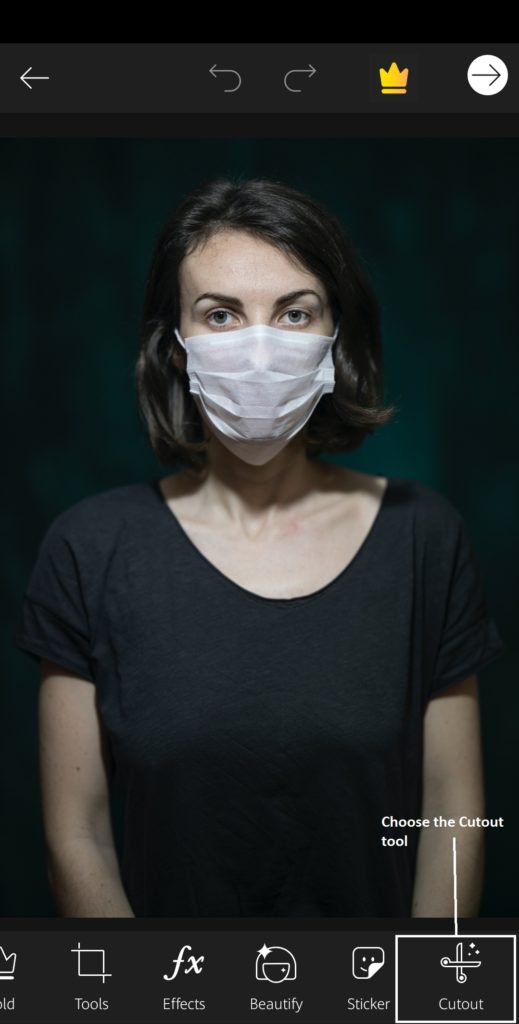
- After selecting the photo from your gallery, you will be prompted with too many editing tools to the bottom of the app.
- To remove background Image from the photo choose the “Cutout” tool shown below in Image 4 below.
Step 5- CutOut the Object
- Now we are one step closer to erase background from the Image and use the transparent photo with another awesome background.
- We have two options to remove the background. First is through “Select tool”, it automatically detects the person or object and removes the background easily (Works better with Portrait Images).
- Secondly, we can use the “outline tool” to select and cut out images manually using fingers.
- You can use any tool to erase background but the Auto tool is best for portrait images otherwise, you have to remove background manually.
- Now, If it is a person in the image, you can click on the “person” to focus above the “select tool”. If you want to select a face in the image click on the “face” and it will be auto-selected.
- In my case in the Image, it is person, So I used the “Select tool” for selection and “Person” to focus on what to select.
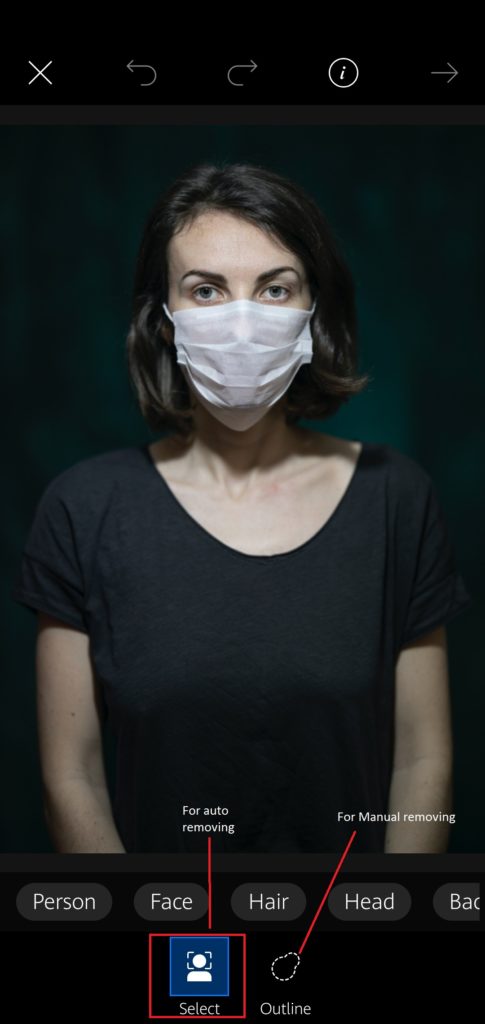
- In my case, I have used “Select Tool” to remove the background; because the selected image is a portrait and hence makes easy to detect the person.
Step 6- Rectify the Cutout
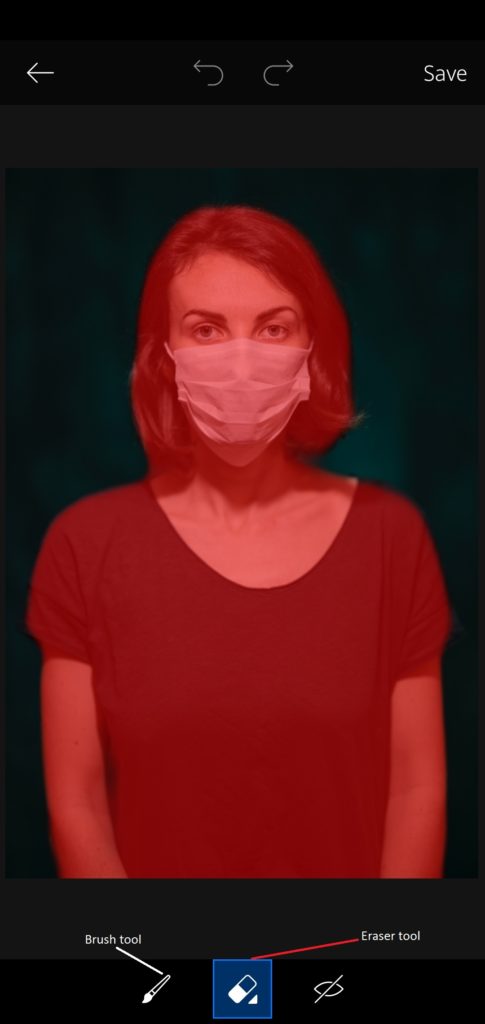
- Once you use auto-remove for removing the background, sometimes auto remover left some portion of the Image. Thus, we have to manually mark the image for better selection.
- In the given image below you can see the area painted in red is to be removed. For a better selection of the person or object use the “Brush Tool” and “Eraser“.
- Use the Brush tool to paint the area to be cut; use the Eraser tool to erase the paint from the unwanted area.
- If you have to erase the small portion of the paint, then you should use a small size eraser. You can change its size; click on the eraser tool and you will be prompted to adjust the size.
- Besides the Eraser tool, you can see the eye-shaped tool if you want to check how well you selected the object use the eye.
- When you are done painting the image perfectly, click on the “Save” to proceed further.
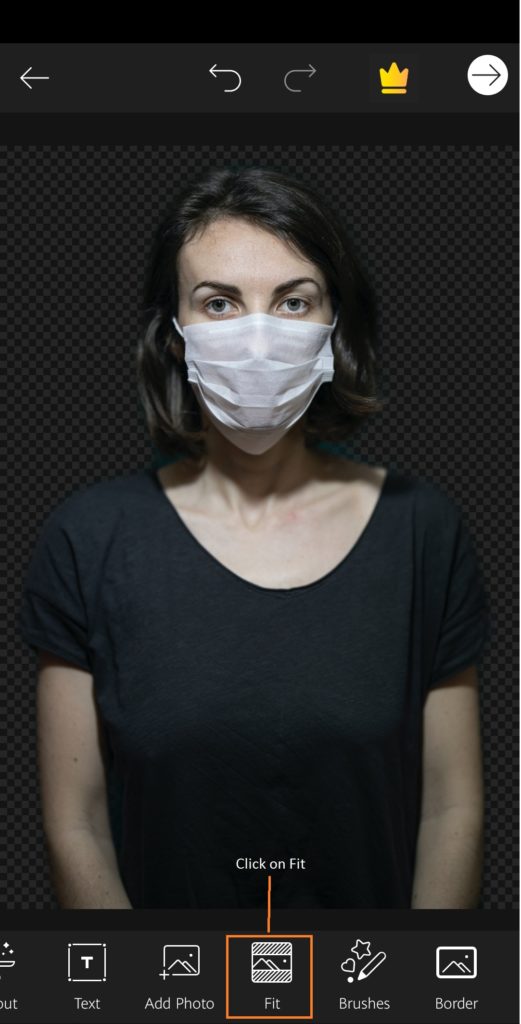
Step 7- Select Fit tool
- You can clearly see in the image below we have removed the background successfully without any error.
- Now, our aim is to add a beautiful background to this image.
- To add Background Image to the Picture select “Fit tool” and proceed.
Step 8- Change Background
If you take a look at the image below you will find a lot of options such as Ratio, Color, Background, Image, and Shadow.
We will see each option in detail so that you can easily make use of them to modify the image and add the background you want.
For explanation purposes, I have marked the tool with a specific number.
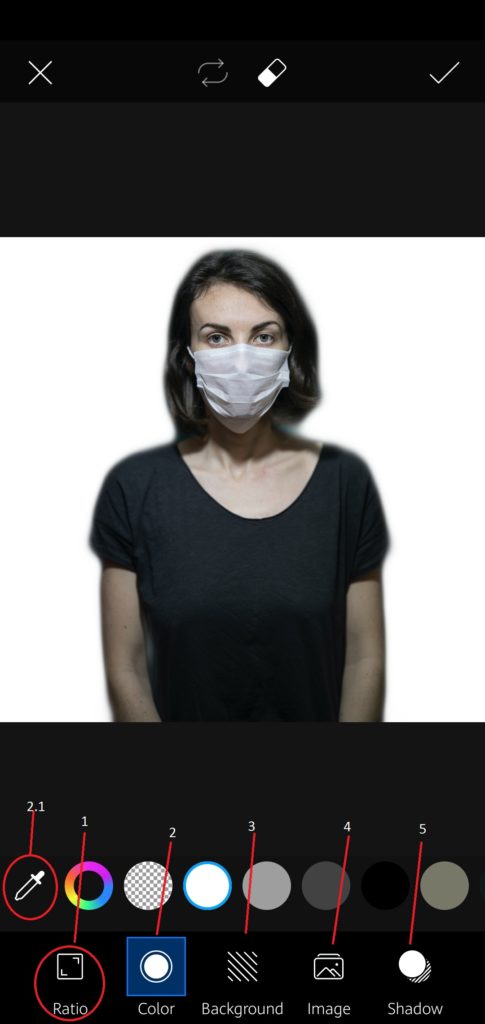
- You can see the option marked 1 is “Ratio”. If you want to change the image ratio or size of the image you can use it.
- In 2nd number, you can see the “Color” tool. This tool is used to change the “Background color”. As you can see, currently my background color is white and you can also see the color option available. You can use any color you want to use in the background.
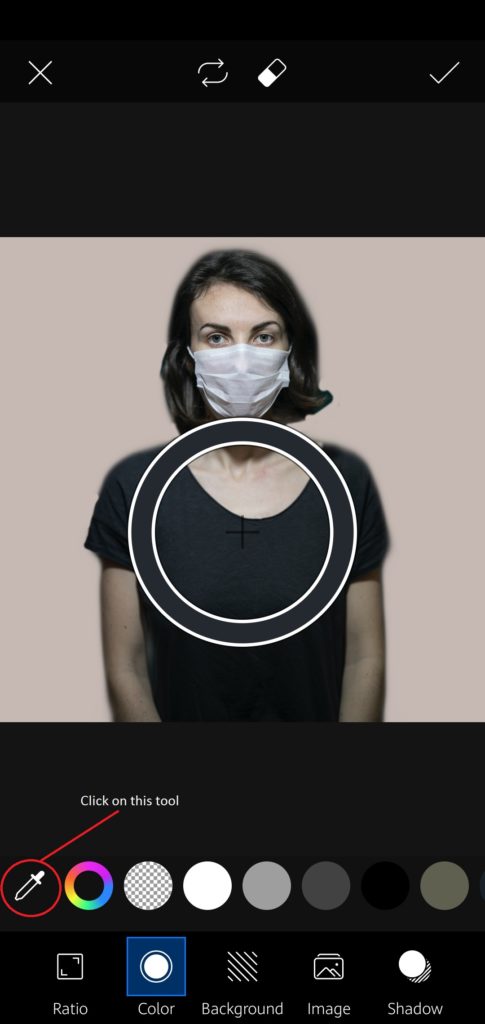
- To select the matching color related to the Image click on the tool, I have mentioned above in Image 9. As you click on the tool, you will see a + sign on the image, as you hover around the image it automatically detects color.
- And the color of background changes as you hover. And, if you like the color just stop there and background color changes according to where your + sign is.
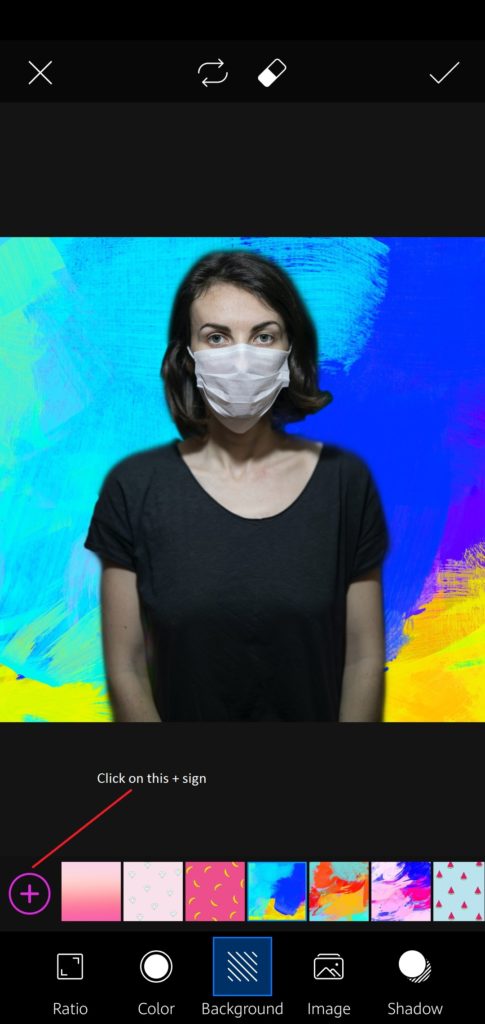
- As you click on the “Background”, you will see a lot of fascinating designed and colorful backgrounds. The background designs are provided by PicsArt itself, you must have the internet to use these backgrounds.
- If you want to explore more designs and background art provided by PicsArt, click on the + sign.
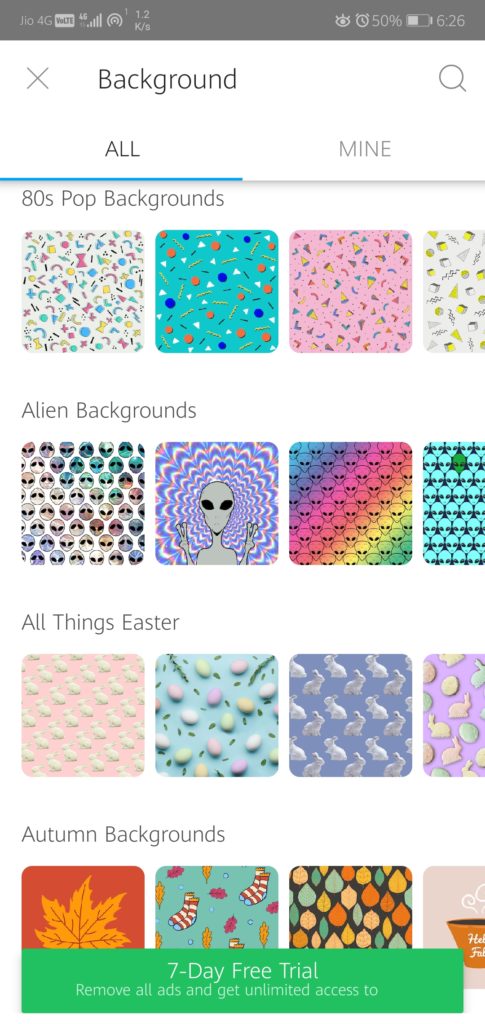
- As you can see the categories of background provided here are awesome and eye-catching. You can choose any design you want to use in your Image as a background.
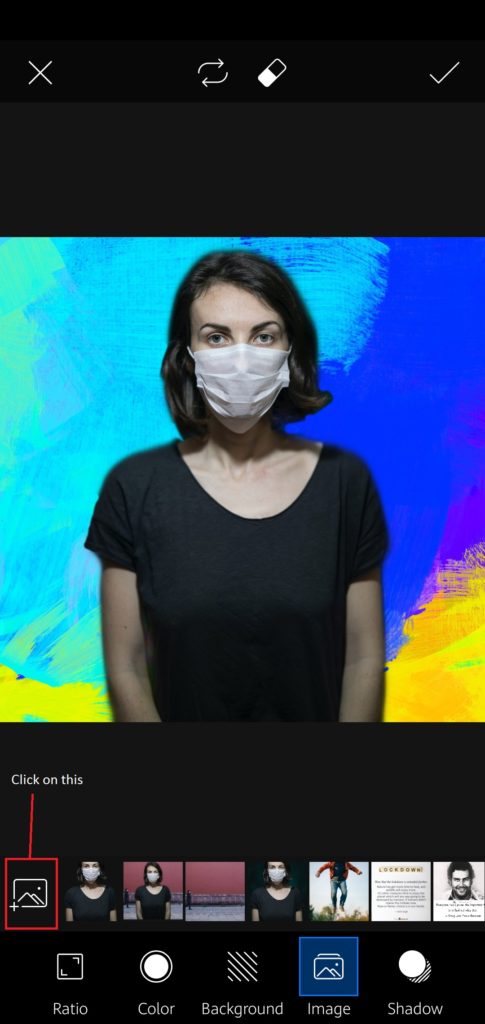
- If you want to use your desired photo in the background of the image then “Image tool” is the option.
- Click on the option I have marked in red in the above image. As you click, it will open your gallery photos and you can use them to your background easily.
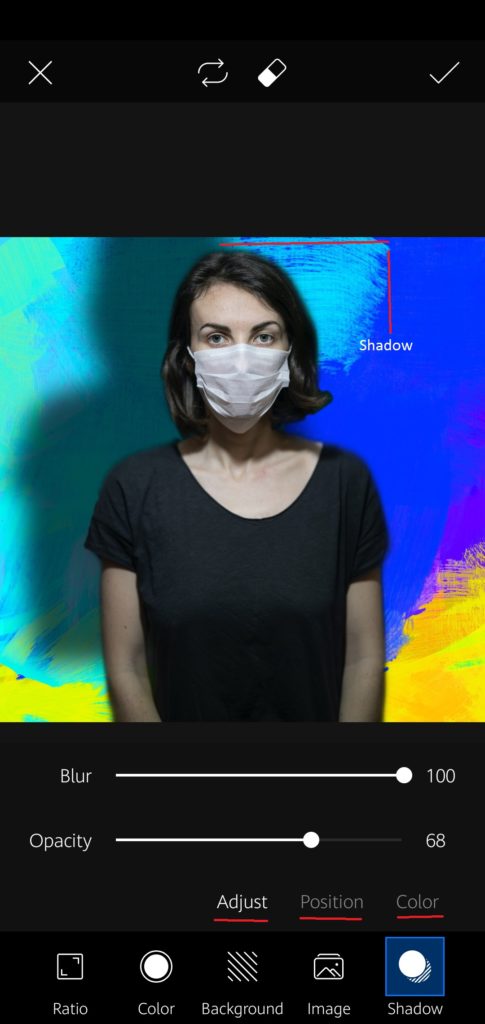
- It is very important that our photos look real, for that our last tool is the “Shadow tool”.
- Shadow tool helps to create shadow according to the Image which makes photos real.
- You can even choose the position and color of the shadow that is to be imposed in the background.
- In Adjust, you can blur the background and use the opacity to edit the transparency it required to look real.
Step 9- Close the Editor
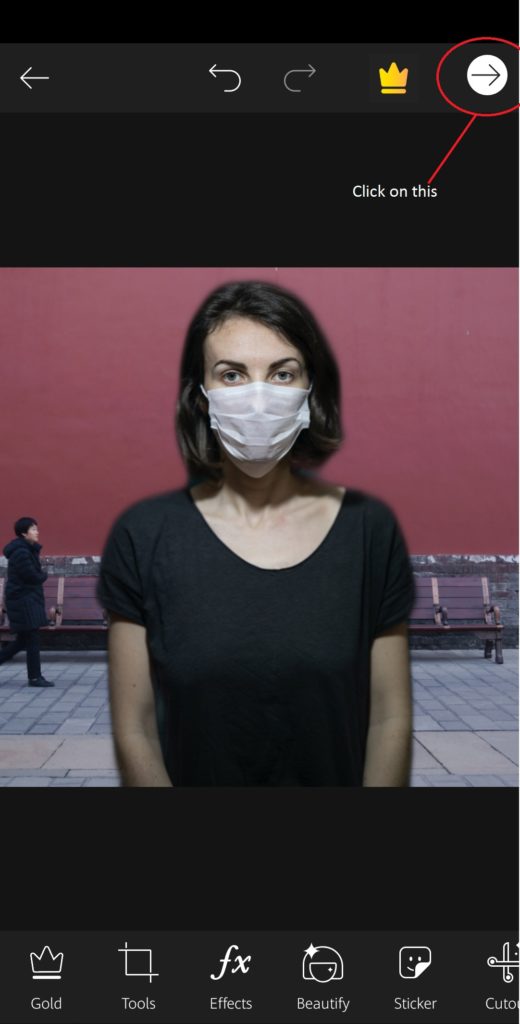
When you are done with the steps 8, click on the ✔ (checkmark) symbol. Now, you have successfully removed the previous background with your desired one.
Click on the sign, I have mentioned below in the picture. When you will click on the sign, you will be prompted to save the image.
Step 10- Save the Image
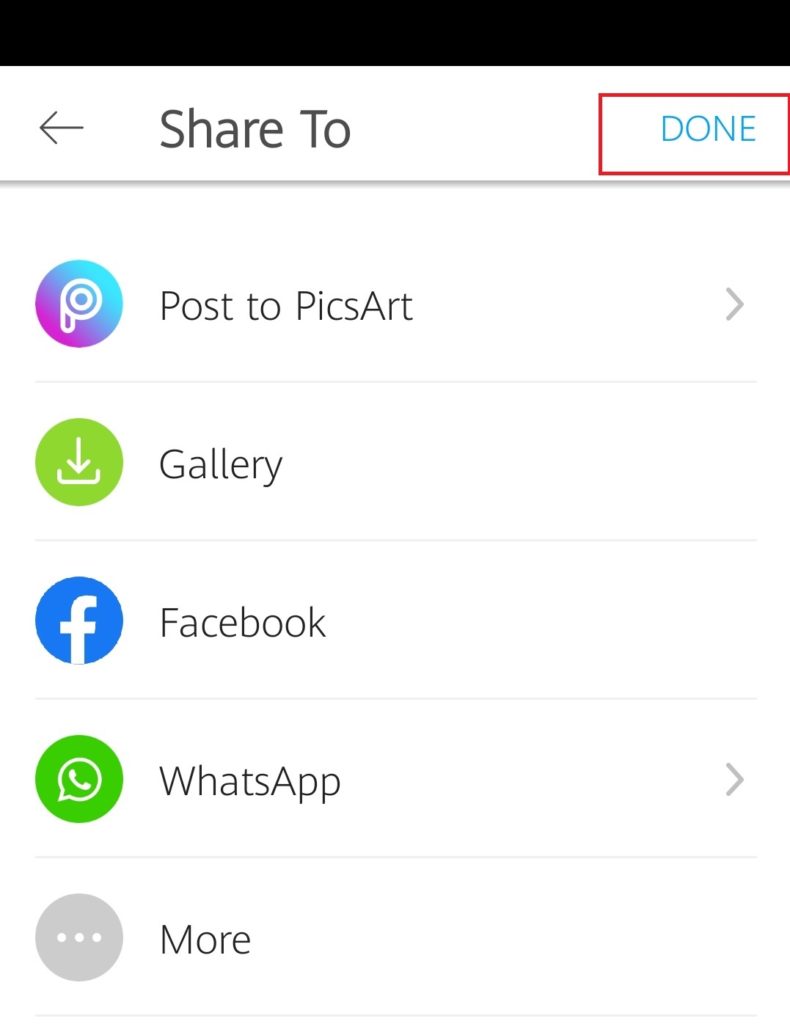
Now, it’s time to save and share the awesome work you did with your peers. To save the image in this gallery click on “Gallery”. Click on Done after you saved your work.
You can also share the photo with Whatsapp, Facebook, and to other platforms. To share on other platforms choose the “More” option.
See, Its a matter of second to remove background using PicsArt app. Tell us about your experience with the app and this tutorial. If you liked the article share with the needed.
Note:- The image I have used in this post to teach the tutorial is not mine. I have used it for educational purpose and I don’t hold the right of the image.

Comments are closed.